
If you’ve been paying attention to our blog for small business owners, by this point you would know that Social Media is no longer an option for businesses. It has become a necessity for businesses to grow and attract new users, with Social Media's ability to give brands a chance to present themselves on a personal level. I personally have had the pleasure of watching a few companies experience booms in revenue due to improved Facebook marketing.
Setting Up Social Media Pages For Your Business
The Bare Basics (& some theory)
Sometimes the best way to understand how to manage something, is to first picture what exactly this “something” is supposed to do. You can be the greatest business mind in the world, but if you think a fish was made to do accounting, then you won’t get anywhere. So to iterate clearly, Facebook makes you more discoverable to a network of over one billion online users.
One might argue that their website is sufficient and performs the same function, however, that person might be very much mistaken. Okay, not might, they ARE mistaken. Facebook gives the small business owner the chance to connect directly with consumers, potential and loyal alike, which will help drive clients due to better customer care. The fact that people spend most of their leisure time (and some of their work time) on Facebook means that your presence is bound to be noticed by someone, provided you put in the work.
I personally have found a multitude of things on Facebook; an apartment, dental clinic, a job and so on. So now that you understand that being part of Facebook is a non-negotiable, here are the first steps:
1. Go to the top right hand side, near the lock icon, and click Create Page.


2. Choose the type of business page you are creating.


3. Fill out your information. Especially if you are looking to be classified as a local business, make sure your full contact information and address are there. Facebook will naturally direct traffic to your business page if it’s growing and engaging, and if it is relevant to the user (i.e someone looking to buy right now from a local store near the user).
Profile & Cover Photos
Now that you’ve set up the basics, your business is live on Facebook, the world’s largest social network. So how do you stand out? The first thing I recommend is, if you don’t already have a fantastic logo or brand materials, it’s time to invest. If you don’t have the money for a professional designer or photographer, have no fear.
Just like we at Solomoto create marketing solutions for the small business owner, there are other platforms and apps that specialize in this area of branding. A personal favorite, is the no nonsense app Salt. I also recently wrote an article on 6 tools for logo creation that take a variety of budgets into account.
I would say that the best way to think of your profile and cover photos for your newly minted (or recently updated) Facebook business page is; your profile photo serves as a place for your brand Logo (for McDonald's it would be golden arches, for Nike the swoosh etc). The cover photo is more like a seasonal banner. While the logo should be timeless, cover photos are due for a couple of times a year. Make sure though that your cover photo is clean, without too much noise (collages, too many pictures, words etc).
Since the cover photo is more about the personality of your brand, try to keep it clean, neat and organized. Above all else, make sure your potential page viewer knows why they are on the page, the cover photo will be the first thing on your page that conveys the message (after possibly the name). Canva provides a great service for finding and editing great cover photos. For more on the new Facebook business page layout, you can read this article.
CONTENT
Facebook pages rely heavily on content, depending on your field of work the best types of content may vary. However, there are four types that are usually very useful and eye catching.
- Photos
- Video
- Infographics
- Articles
Each of these forms of content should be used in variation, aka the spice of life. However, you must decide for yourself which best suits your industry and produce content accordingly. For instance, if you run a restaurant, you should focus on videos and pictures of your food, as well as infographics about cooking tips and recipes. If you’re a doctor, you may want to focus more on infographics and articles to relay key medical messages to your audience.
Facebook decides how often your posts will pop-up depending on engagement with your posts. The more engagement your posts get (likes, shares, comments), the more likely it is for your post to reach a larger audience. That said, you should write your content with the best intentions for your clients and consumers. The reason for that is longevity. While you may be able to create a stir in the short run by posting clickbait, people will eventually understand your posts don’t have value.
Lastly, not all content has to be original, but some of it should be. People want to see that you know more about a certain industry than they do. This will increase trust and eventually turn your current fans into buyers and their friends into followers. Try to keep a ratio of 80/20, 80% borrowed, 20% original. Make sure that when you do borrow content you are giving credit where credit is due.
(Here is an example of how we gave credit to an article by Entrepreneur)


Tips & Tricks
So now that you are up and running with your Facebook business page and you are curating and pumping out content faster than the speed of light, here are a few tips to keep your page moving forward.
1. Be consistent - You don’t have to post every minute of everyday or even every hour. What you should do though, is make sure you’re posting almost everyday. This is done fairly simply with the Facebook post scheduler, Solomoto also provides a post scheduler that you can use for multiple channels if you find you are pressed for time.
2. Smaller is better - Since your posts are meant to catch attention to the content you're sharing, try to be sure the headline you use is short. 40 characters or less is usually the way to go. Don’t turn your post into an article, your article should be a separate page that a user can go to, your post is simply meant to draw the attention there should they want to see more.
3. Be diplomatic - Don’t let politics or personal bias cloud your judgment. Business should be void of all bias. To know which content is appropriate, always think to yourself “Would I be proud to show this to my family”.
4. Be one with your clients - Gear your content towards what helps your clients, not yourself. That means content should be built on what your clients need to hear, not what promotes your business.
5. First Responder - Get the Facebook messenger app for your business page so you can respond to clients ASAP. The faster you respond over time the better your customer service will be displayed on Facebook. They will write that you get back to consumers quickly and that will encourage more potential customers to engage and message you.
When To Post on Facebook:
Best time to post on Facebook for Saturday and Sunday - 12 - 1pm
Best time to post on Facebook for Wednesday - 3 - 4pm
Best time to post on Facebook for Thursday and Friday is 1 - 4pm
Best time to post on Facebook for Monday & Tuesday is 4 - 6 pm
(Source: Shortstack)
Every market is different, so see what works best for you. Don’t be afraid to experiment but always be sure you are tracking what you do so you know what works and what doesn't.
Twitter is a great medium for connecting with clients, potential clients and other businesses in your market that provide added value (i.e complementary products or platforms and programs that assist your business). 140 characters is all twitter allows a user to post, which will force you to be creative. To maximize the potential of each post, use a relevant hashtag. #mondaymotivation and #wednesdaywisdom are two hashtags I found to be very very helpful. Furthermore, posts with pictures tend to generate more engagement.
Try to follow people in your target market as well as competitors to see what they are doing, what works for them and so on. To help keep track of how your Twitter page is performing there is a great tool called Fanpage Karma, which allows you to track your progress compared to competitors (can also be used for Facebook and Instagram).
Setup
Let’s start at the top. Here’s how to get your Twitter page started.
-
Download the app or go to Twitter.com.
-
Choose a username - Your Twitter handle will be the foremost way for people to find your Twitter page. Be sure to get your company name in there. Don’t get cute. Be straightforward, if your business name is Mishelle’s Mani-Pedi your username should be “@MisheManiPedi”. The reason I did not write the full name is because Twitter limits your username to 15 characters or less. Keep that in mind.
-
With 160 characters for your bio, use Bitly.com to shorten any links you would like to include in your bio. Also, use relevant hashtags so your account comes up when people search for the same hashtag. Twitter recommends using a unique link so you can track how many people visit your site via Twitter.
-
Profile Picture - Again, similarly to Facebook, your profile picture is a small space that should be focused on your logo above all else.
-
Header Image - Similar to Facebook, this acts as your cover photo. Twitter recommends you treat this as a billboard, and I tend to agree. This space should convey the message of what your brand is all about.
CONTENT
Twitter allows for a more direct feel as you can tweet directly to a person or party. For that reason, simple posts are more effective than they would be on Facebook. However, be sure to use those hashtags to make the most of every post. Other types of content that apply directly to Twitter are photos, videos and infographics. You can also post articles, but be sure to include a photo and use Bitly to shorten the link to make sure you have enough space.
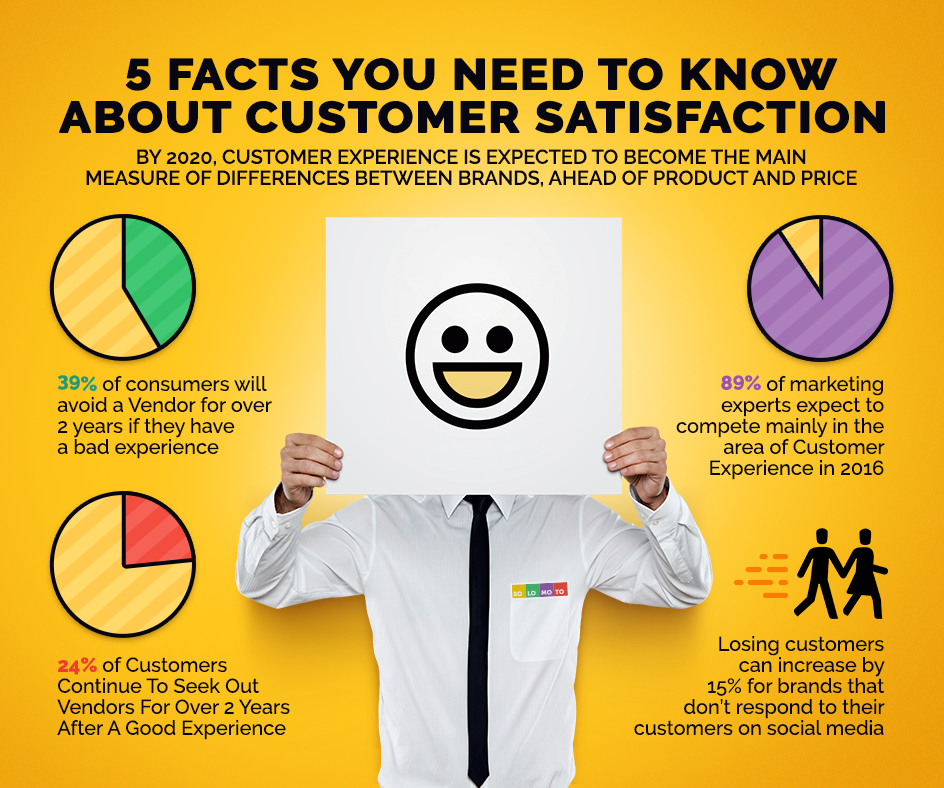
Infographics are the best for Twitter as it provides you an extra space in the picture to convey a message.
PRO TIP: Translate your ideas into engaging content in the form of Infographics or Charts and other forms of visual content with Visme. This tool provides pre-designed templates along with drag-and-drop functionality to enable you to create various forms of visual and engaging content which you can publish and share online, make it private or download for offline use.
Here is an example of the infographics we make:

Tricks & Tips
-
Be Helpful - Use Twitter as a tool to find out the questions your target audience asks, and answer them so you can establish your authority in your field. Being helpful is also a great way to get new customers.
-
Share Compelling Content - Twitter is the place where you can also share general news. It doesn’t have to be directly related to your audience (it is a plus though), if people see you’re curating interesting content, they will follow.
-
Engage new followers - I use a tool called crowdfire that allows me to create a few different messages that are automatically sent to anyone who follows my account.
-
Reuse Content - Unlike Facebook, you can reuse old content far more frequently as tweets are far more fleeting. That means if you posted something awesome, post it again the next day or even the same day. Most people will not have seen it the first time.
-
Consistent - Again, you don’t need to be posting all day, but you should post at least once a day. Use Tweetdeck to schedule well in advance.
-
Give credit - If you retweet, or use other people's content tag them using their Twitter handle.
-
Hashtags - Hashtags are most crucial possibly on Twitter more than any other social network, but don’t over do it! 2 hashtags is usually more than enough.
Best Times to Tweet:
Monday - Friday: 12 - 3pm
Wednesday: 5 - 6pm
Weekends: Anytime during the afternoon
(Source: Shortstack)
Instagram:
Instagram is one of the most powerful tools a business can use to expand its reach, and in this article I’m going to show you how to get started today. Instagram advertises itself as a storytelling platform, and with its new story post feature, you can show your users what’s happening in your business live.
Setup
The first steps to opening a business account for your instagram are:
-
Sign up with your business email address.
-
Choose a recognizable username, you want your business to be at the top of the search list.
-
Pick a profile picture that is appropriate for your business: for example, your company logo, or some of your recognized products!
-
Now that you’ve created a basic profile, you’re going to want to go to settings, and click on “Convert to business profile” this will allow you to access Instagram Insights which provides you with account analytics.
-
After filling in relevant information, you will have the option to link your account to Facebook or Twitter. Go ahead and link it to your business page.
-
Now that your account is fully set up, you’re going to want to post a picture before you start following people. This way, people will see that your account is going to be active, and they’re more likely to follow you.
-
Another extremely useful tool that Instagram has incorporated from Twitter is #HASHTAGS. These useful things allow your post to be seen on Instagram’s main feed where people search for pictures that are relevant to the hashtag they searched. This expands your reach significantly, and makes sure that you’re advertising to the right crowd.
CONTENT
Your content must be appropriate to your business in order to maintain relevance. Many people forget that Instagram is mainly based off of aesthetic appeal: therefore, pictures, videos, and stories apply differently to various businesses
Photos are extremely relevant to purely aesthetic products such as fitness apparel, food, electronics, and furniture. Businesses in which the product sells itself benefit the most from photos.
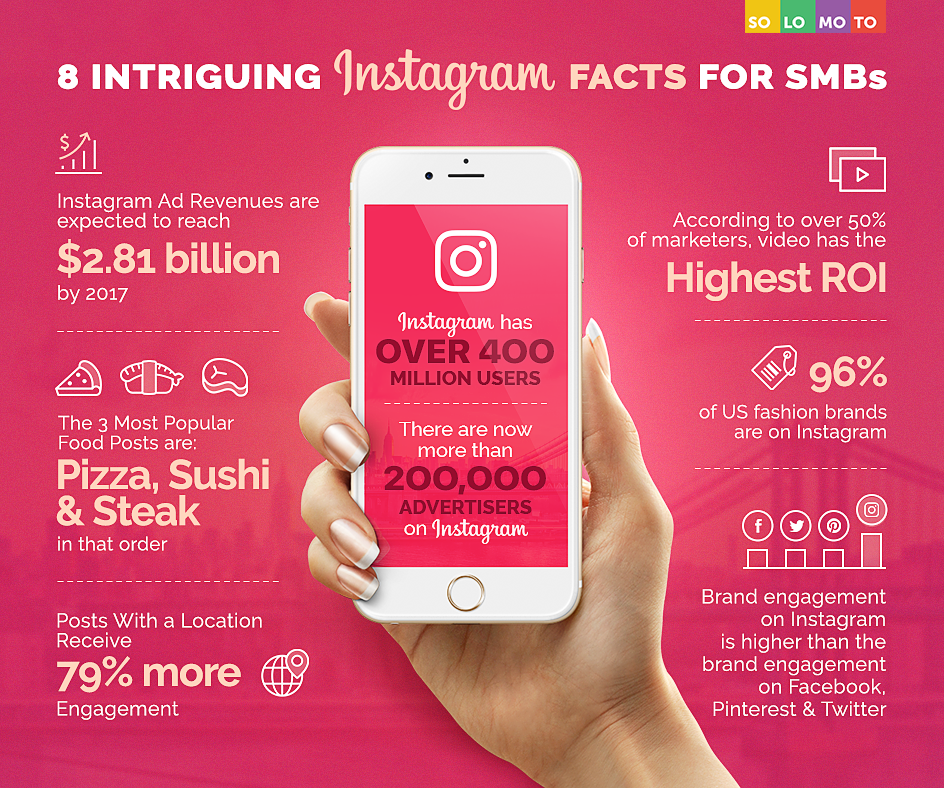
Infographics are one of the most powerful tools in content marketing, they allow you to put words on your photo to visually convey your message. An example of an effective infographic is shown below.

Videos can aid aesthetic products just as much, but products or services in which performance cannot be shown simply through a photo as well. If you’re selling ice skates, or karate classes, people would like to see this in action!
And last but not least, Instagrams most recent story feature which allows you to post a photo or video and it will stay at the top of your followers feeds for 24 hours. This is great if you want to direct users to your online store, you can post a photo of a product and caption it “free shipping + 10% off!” and it will last exactly 24 hours before it automatically gets taken off. It is also beneficial if you want to show off various parts of your business which aren’t sufficient enough for a post but are still of interest; for example, people claiming their discount at your store! A story is more personal than a photo.
Tricks & Tips
Now that you know how to get set up, why don’t we start with some of the Pro Tips? Just knowing how to get set up is not enough, you’re going to have to make sure your content is as effective as possible in getting followers.
Immediately after you set up your Instagram account you’re going to want to set an Instagram status that reflects what your company is all about. Your status and profile picture are among some of the first things a new potential follower is going to see when they click on your profile. Set a status that keeps users engaged and encourages them to like your photos!
Another tip is knowing when to post. Just like every other social media platform, there are peak times of user engagement.
Best Times to Post On Instagram:
Anytime Monday to Thursday, except for 3 - 4pm.
(Source: Shortstack)
Don’t forget to experiment and track your progress. To make sure you’re being consistent in your posting, use the Solomoto post scheduler for small businesses. There you have it, the basics to getting your instagram business account up and running! Thank you for reading and good luck!